A slip bag is a simple little tool that doesn’t get used enough in my opinion.
Slipping is an essential component of your defensive game and a slip bag is an effective way to get better at it.
What You Need to Build Your Slip Bag
You likely have everything you need to make a slip bag in your house already.
The list of components required is:
2 eye hooks
fairly sturdy string
the bag (can be a sock, a sack, pillow case or something strong you can put something fairly heavy in)
Making Your Slip Bag
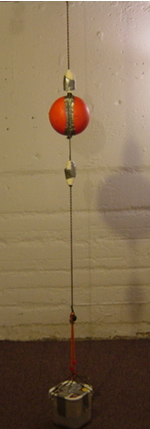
A slip bag is just a bag suspended from your heavy bag stand at about head height. You give it a push – it goes out and comes back at you. You slip – throw a counter combination. It swings back out in front of you, then comes back at you. You slip again, throw a counter combination and so on. Every so often you give it another push to keep it swinging.
I’m sure you’ll get the idea of what you’re building from the picture here. This version uses two eye hooks that allow you to easily adjust the height of the slip bag. You just pull the string through to raise the slip bag or loosen it to lower it. As my son and I both use it – it’s nice to quickly adjust its height. You may not require it.
Make the Slip Bag. I’d say that most people just take a sock, fill it with sand or rice or popping corn or even rocks and then duct tape the top shut. Use whatever you have to make a bag that is about the size of closed fist. The heavier it is the longer it will swing without needing another push. You don’t want to fill the entire sock – just enough to create a round ball.
Attach the slip bag to your new heavy bag stand, ceiling, or doorway.Alternatively you can feed the string through a couple of eye hooks to make it adjustable as I’ve done. Tie it off and you’re in business.
In a boxer’s training arsenal there are few pieces of equipment that will hit back. The double end bag is the best you can get without a sparring partner.
What exactly is a Ceiling & Floor ball (double end bag)?
Nothing more than a ball or punching surface suspended about head height by some type of elastic material so it rebounds when you hit it.
You will need:
Two-three bungee cords
1 x ball of some sort (I used a foam Nerf one I stole from my kids)
Duct Tape
2 x strips of material (rags)
Some heavy duty string
1 x ice cream pail
Rocks and sand.
Time Required: Approx 1/2 hour and then days and months and years of practicing.
Total Cost: Less than $15 – You can probably find all of this stuff around your house in which case nothing.
Assembling Your Ceiling & Floor ball
1. Building the Base.
The double end bag is suspended at head height by two bungee cords. One goes up and is attached to the new heavy bag cage you just built. The other goes down and is attached to the floor. If you’re like me, your floor is either made of concrete or some material that would require mounting a bracket to give the bungee something to attach to.
Drilling things into my concrete slab wasn’t an option so the next best option is to build a base for it. With a little thought you can probably build something a little more nicer looking than I did.
The base just needs to be heavy enough to hold the bag in place when you hit it. I actually found that allowing the base to move slightly created differing bounces on the rebound depending on how I hit it, so I would suggest not trying to anchor it firmly in one place, but let the base be light enough to move around somewhat – not a lot, but a little.
My base is made out of an ice cream pail filled with rocks and sand. It weighs about 15-20lbs. The lid is duct taped on and I’ve put a loop of heavy duty para cord (any cord is fine) from one corner to the other to create a loop I can attach the bungee to. This has worked perfectly for about a month now with no need to fix it.
2. Building Your Punching Target. For this I took a foam Nerf Ball that is approximately the size of a 16oz boxing glove – slightly bigger – to simulate a punch coming at me. It gives me a nice sized target to hit as it’s moving all over the place. You’re going to love doing combinations on this thing…excellent for getting your timing more realistic as opposed to a heavy bag.
Anyways, take the ball and wrap some cord around it, tying it tight. It has to be tight as when the bungees pull on it will deform your ball somewhat but that makes it all the more unpredictable. Once the cord is tied around it, wrap duct tape over the cord to keep it in place. Leave a little opening on either side of the ball to hook the bungee cord onto.
I’ve been hitting the ball you see here for a month now and it has not had to be readjusted, re-taped, fixed or anything. It’s ugly as hell but it just takes the punishment and keeps on going.
3. Hooking up the Bungees. There are two parts to this. First you have to hook the bungees to the ball. Simply take the hooks and hook them on the cord where you left spaces in the duct tape on either side of the ball. Now that is going to leave you with two nice steel hooks at about eye level when all is said and done so you HAVE to wrap the hooks in material and then duct tape the material in place. See the above pic to see what I mean.
That will protect you from catching a hook upside the head. Alternatively you can tie bungee directly to the string, cutting off the hooks, but this was easier and works well.
The second part of this is hooking the bungee up to the base and ceiling. For the base just hook the bungee hook into the loop you attached to the base.
The other bungee gets hooked to the heavy bag stand you made or your ceiling. The easiest way is to put an eye hook into the beam and attach the bungee hook. You may have to figure something else out depending on what your ceiling is made of.
The fun part is adjusting the ball so it is approximately at shoulder height and has a good spring back when you hit it. If the bungees are too loose the ball will travel really slow which is not very realistic. All you have to do is tighten the bungees on both ends (otherwise the ball will move up or down). Do this by shortening the bungee by putting another wrap around the loop in the base or around the hook at the top. It’s going to take some fiddling with.
Once that is done, you’re done. You now have a double end bag that you can beat to your heart’s content.
One of the things I love about boxing is how affordable it is to start. It lowers the barrier of entry and opens the door for people to choose learning how to box over learning how to do other sports.
There are only a handful of sports where you, by yourself, can progress and learn skills without having to buy a whole lot of equipment.
Even better – if you’re at the point where you do need or want some boxing equipment to take your training to the next level – there is nothing spectacular or complicated about boxing equipment and it’s possible to improvise most of what you need and DIY with low cost materials. So if you’re broke or simply don’t want to go out and buy equipment you should consider building yourself a home made boxing gym.
I’m going to show you how to make your own home boxing gym which is every bit as functional as one equipped with brand name equipment.
Elements of the Boxing Gym
To fully outfit a home boxing gym the requirements are fairly simple and I’ll show you step-by-step below how to make it all for less than $200. The same equipment you’re going to learn to make would cost you at least $1000 if you bought it new.
You need:
Adequate space
The Heavy Bag Stand or Cage (approx $150)
Heavy Bag (approx $15)
Double End Bag (approx $15)
Slip Bag (likely FREE)
Uppercut Bag (approx $15)
The only thing you’re going to be missing with this set up is a speed bag and platform – but to be honest – that frustrating little ball has very little application to what happens in the ring. It just makes you look bad ass in the gym when you figure out how to hit it right.
Let’s begin…
Home made Workout Equipment
Home made workout equipment is a must if you want to eliminate unnecessary money spending. It is also a bliss to have equipment at home. Why? Because then you can work out whenever you feel like!
Home making your own workout equipment will help you save money. Purchasing a home gym is scary for many. Countless attachments, cables, moving parts, options and sales pitches. All you actually need is 2 to 7 pieces of equipment to have a functional gym. You do not need any machines.
That’s right. You are not required to have any of those fancy, thousands of dollars worth machines to build a great body at home or lose weight. Home fitness is real and effective. Your whole family will be able to stay in shape together, with no expenses after the initial material costs.
Compare buying and renewing 5 gym memberships for years with a one-time purchase of a set of dumbbells and a few other, under 100$ pieces of equipment. Which would you prefer? Having home made workout equipment will save you a lot of everything while giving you benefits and flexibility.
Benefits of Home Made Workout Equipment
You learn more about the equipment because you make it
You gain functional strength
You can repair anything that breaks
It is as expensive as you make it
It is as good as you make it
You gain all of the benefits of working out at home
You own the equipment
You can always improve it
You will spend less money on fitness
Adequate Space
How much space is enough to build your boxing gym?
You want a space big enough to divide into two areas. One area is where you’re going to hang your bags and do heavy bag work. The other area is simply open space where you can move around to shadow box, jump rope, or do whatever type of strength, interval, or endurance training you’re working on.
If you want to replicate the type of space you’d find if you were standing inside a boxing ring, then your open space should be a minimum of 4.9m square to a maximum of 6.1m square (that’s a ring size of about 258-400 square feet).
Now I know that’s quite a bit of space and unless you live in a place where it’s warm every day of the year, you’re likely contemplating putting your gym in your garage or a basement. I know my garage can’t handle dimensions like that (and still have room for the car) and have a separate area to hang my bags so I’ve shrunk my open space area to something closer to about 20 square feet.
With a smaller space – you just envision yourself controlling the centre of the ring as you shadow box. You’ll still be able to practice all your movement, pivots and the like – you’ll just be limited in how far you can actually travel in one direction. You want to work a lot of angles and direction changes into your training anyway.
For the area where you’re going to hang your boxing bags – you want enough space ideally to hang both a heavy bag and a double end bag so you don’t have to interchange them when you want to use them. Each requires enough distance around them to ideally allow you to circle each bag 360 degrees.
If you’re looking at one bag – it’s an area of about 64 square feet (8ft x 8ft). Add another 4ft onto the width for a second hanging bag so about 12ft x 8ft = 96 square feet.
Combining your space requirements means you’re looking at a minimum area of about 84-116 square feet. That’s about as small as you want to go – but if you don’t have that much room – then you work with what you’ve got – don’t dismiss your home boxing gym – adapt and overcome.
How to Make a Heavy Bag Stand or Cage
I built the heavy bag stand that I use in my garage boxing gym. I wanted to avoid hanging a lot of weight from my roof (as I have two heavy bags and a double end bag) and also because I train early in the morning and my daughter sleeps right above the garage.
I initially did hang the heavy bag from the roof but the vibrations (even with a heavy bag spring) made it sound like the house was falling down. My daughter is 19 and didn’t appreciate waking up at 5:00 am with me.
So I had to find a solution that did not involve hanging the bags from the roof of the garage.
If you look around for a heavy bag stand – you’ll find a number of options and most of them do not allow 360 degree movement around them. The ones that do are basically cages but they’re massive and cost a fortune (thousands of dollars). I wasn’t interested in paying that much so it was time to improvise.
I couldn’t be happier with the result. I built it out of wood for about $150. It’s custom sized to the space I have available and sturdy enough to withstand the weight of two heavy bags (about 3-400lbs). I can use it as a chin-up bar, hang a TRX or other suspension trainer on it, and attach/detach a slip bag and double end bag, and probably other uses I haven’t thought of or needed yet.
All that for $150 and a weekend of work. Well worth it.
I recommend you read through the instructions here in their entirety before trying to build – you may see some things that you’d like to do differently or maybe assemble things in a slightly different sequence.
What You Need for Your Heavy Bag Stand (Cage)
The list of materials to build a heavy bag stand resembling mine consists of:
Wood
4 – 4 x 4 x 9 (I just got the cheapest stuff I could which happens to be pressure treated)
8-2x6x10 (Spruce – again cheapest I could get). Note that the picture only has seven – I had to go back and get one more…you need eight.
2-2x4x8 (gets cut up in 2ft sections to make the braces)
Hardware
4-8″ lag bolts (you can actually use shorter ones – 6″ would work fine) with nuts and washers
4-6″ lag bolts with nuts/washers (only two in the picture, but I had to go back for two more)
4-angle brackets (about 3/4″ – 1″ wide is fine)
box of 3 or 3.5″ wood screws
Assembling Your Heavy Bag Stand (Cage)
Keep in mind that I’m no engineer. I’m sure that if you have any carpentry or woodworking skills whatsoever you will be able to improve on my design. There is nothing complicated about this and it seems to be doing the trick for me. I did learn a thing or two about building it that I can pass on so you don’t make the same mistakes (like bracing the legs while it is laying down and not trying to do it by yourself as it is standing up…that was fun). So here we go:
1. Build your weight bearing beams. For this you use six of the 2 x 6 x 10s. You screw one to the other so you end up with three beams. You don’t need to cut them unless the space you have is less than the length of the boards -if so you’ll have to customize the size of your stand/cage.
By screwing the 2 x 6s together you significantly increase the amount of weight the boards can support. So lay one of the 2 x 6s on top of the other – line them up so they are square and then put some wood screws into them at an angle, alternating as shown in these pictures.
2. Build the Sides of Your Cage/Stand. You’re going to build two of these, so just repeat once you have one done.
a. Measure and Drill Holes for Assembly. The idea here is that you want to attach the beams to the 4 x 4s which are the legs of your stand and then brace them so it can hold everything up without moving too much. This stand is going to creak and groan and flex a little but it won’t fall down…
You’ll use the big ass lag bolts so you need to drill a hole the diameter of the lag bolt through both the 4 x 4 and the beam you just built.
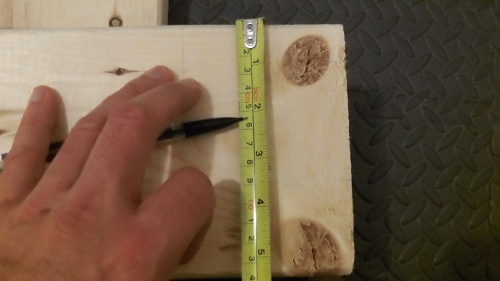
Lay two 4 x 4s on the floor and put one of your beams on top of them to space them out and make your measurements. You need to come in from the end of the beam and 4 x 4 so when you drill everything lines up nice.
Measure in from the end of your beam the width of a 4×4 and divide by 2 so the hole will match up with centre of the 4×4.
Measure middle of your beam width.
Mark the hole where you’ll drill.
Now move on to one of the 4 x 4s. Measure down from the end half the width of your beam. Then mark the middle of the 4 x 4. That should be the spot where you drill and it will match up with the hold you put in your beam.
Hopefully the pictures make my explanation more clear…Once you have the holes marked – drill a hole the diameter of your lag bolts (I believe I used a 1/2″ wood drill bit).
The back cross brace
Now before you move onto assembling each side, you need to pre-drill a hole that will be used to attach the back cross brace which is a 2 x 6 brace that basically makes it possible to stand everything up. Decide which of the 4x4s is going to be the back of the cage – measure about 4ft up from the bottom (so when it stands up the brace is about 4ft off the floor and drill a hole front to back the same diameter as one of the 6″ lag bolts. Make sure you turned the 4×4 before drilling – the hole shouldn’t be on the same side as the holes you’ve already drilled. Repeat for the back leg on the other side assembly.
Now take your last 2 x 6 x 10 and drill holes in both ends just like you did for the beams so it’s ready to be attached to the back legs when you stand everything up.
b. Attach the Beam to Legs. Position the beam ON TOP of the legs, put a lag bolt in each hole and push it through until it hits the floor.
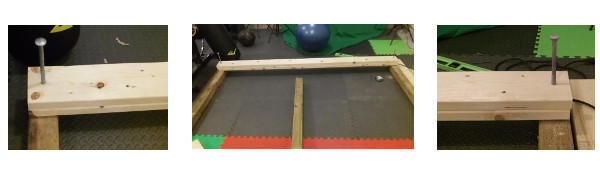
c. Attach the Braces. This deviates a bit from how I built mine but this should make standing the sides up and tightening everything down much easier. When you try and stand it up without the braces, the legs can swing in and out – makes for an interesting experience but not the safest setup. As such I don’t have any specific pictures of this stage of the build but you can understand how the braces work by looking at a picture where I have them on.
You make a brace out of the 2 x 4 by cutting a 2ft length and then cutting both ends at 45 degrees. Screw it to the beam and the leg which will prevent the leg from moving in or out.
Make two additional braces that will be attached to the back cross brace once you stand everything up. You won’t be able to attach these while the side assemblies are on the ground.
The back cross brace again…
3. Stand up the sides and Attach the Back Cross Brace. You’re going to need at least one and probably two people to help you with this. The way I did it (which is not how you should do it) required my whole family (three plus me) and I could have used one more. I’m pretty sure my wife still holds a grudge for that little episode.
Until you get the back cross brace with its braces attached and everything tightened down – the whole cage is very unstable so keep that in mind and be careful.
Don’t forget to push the lag bolts the rest of the way through on all the side assemblies and the cross brace, put on a washer and then tighten them as much as you can.
Attach the front cross brace
4. Attach the Front Cross Brace. With any luck you’re cage is now standing but it’s probably not all that stable.
You have the option of pre-drilling the holes for the front brace like you did the back brace while the sides are still on the floor, but you can also do it while it’s standing. I didn’t find it that difficult.
You attach the front cross brace the same as the back cross brace but you position it just under the top beams and you don’t put any 2 x 4 braces on it. You could and it would probably make it even more stable, but I chose not to so I had more room on the front of the cage.
Attaching the top beam
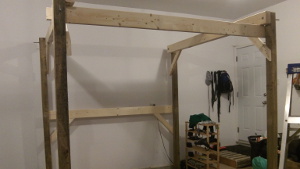
5. Attach the Top Beam. You’re almost there – now it’s time to add the most important beam – the top beam which is the one that your bags are going to hang off of.
It lays on top of the two side beams and is held in place by the angle brackets – two per end, one on each side of the beam.
Haul the beam up and position it on the two side beams. Centre it so a bit is hanging off each end (gives you another place to attach things if you like).
Once you have it positioned – mark it and then screw the angle brackets to the side beams. Put the top beam in place in between the angle brackets and then screw the angle brackets to the top beam. When done you have four angle brackets screwed to the side beam and top beam (two on each side assembly).
Guess what? You’re done. You have a fully functional homemade heavy bag stand/cage. Attach your bags in the usual way and punch away. You should probably tighten the nuts every now and again until you’re sure nothing is working itself loose anymore – but you should get years of enjoyment out of this thing. Hope you don’t have to move it…
I did toy with the idea of putting each leg into a cement filled bucket to keep them from moving around, but I haven’t had any problems. I’m sure it would add some stability to the entire thing, but I don’t think it’s totally necessary.
Now that you have a stand you need something to hang on it and every boxer needs a heavy bag.
There are a variety of ways to make your own heavy bag but I think there is one that stands out far above the rest. Most people will take a large bag like a canvas duffle bag, fill it with sand and hang it up. I guarantee you’re going to hate that bag. It will be rock hard and eventually the bag is going to tear, rip or deteriorate and you’ll have sand all over the place.
Luckily there is a cheaper, better option – the tire heavy bag.
Old tires are usually free – just go to your local dump and grab four old rubber tires. We’re going to bolt them together, attach a couple brackets to the top and hang it. Not only is it going to last you forever – it has give when you hit it and it can serve as an uppercut bag as well as a heavy bag. Four regular size tires (about 23″ diameter) will weigh about 80-90lbs and if you want you can make it taller or shorter adding or removing weight as you please. This tire heavy bag is just as good and probably better than some brand name bags on the market.
What You Need to Make Your Home Made Tire Heavy Bag
The list of materials you need to build a tire heavy bag consists of:
9 – 1″ x 5/8″ bolts
9 – 5/8″ nuts
9 – 5/8″ flat washers
4 – old tires
3 – U brackets
Rope or chain to hang it with
You could probably get away with only using six bolts/nuts to hold the tires together if you need to cut costs down by another $2.
How to Assemble Your Home Made Tire Heavy Bag
It’s super simple. You bolt all the tires together, put the U brackets on the top tire and then hang it with your choice of rope or chain.
That said – I did encounter a couple of challenges when putting it together that I’ll point out to try and save you some time and effort.
1. Bolt Your Tires Together. To do this you take two tires and lay them beside each other. You mark a spot in the middle closest to you on one of the tires. Take a tape measure and extend it out. Keeping one end on the mark you just made make two more marks that are the same distance apart so you basically form a triangle of marks on the tire. For the tires I used the distance was 18″.
2. Draw a line on the mark closest to you as it will be important in a minute. Next mark the second tier the same way. Again, draw a line on the mark closest to you – so both marks that are nearest you will have the lines. When you flip the right tire over onto the left tire, you want the lines to match up. But before stacking the tires take out your drill and drill holes where you made the marks. You’ll have to push hard to start so the bit doesn’t run all over the tire and once you puncture the tire move the drill up and down and side to side to make the hole a little bigger than the bit. I used a 5/8″ bit for the 5/8″ bolts and had a hell of a time pushing the first bolt through the hole. The bit makes a hole but the rubber really grabs the bolt. You’ll save yourself a lot of time and effort and frustration by ensuring the hole is big enough for the bolt to slide through.
Once you have your holes drilled, take three of the bolts and insert them from the inside of a tire so the threads are pointing out. The pictures should give you a good idea of what I’m saying. With all three bolts pushed through one of the tires flip that tire over matching the lines up and push the bolts into the inside of the other tire.
This won’t be easy. It took me a while to wiggle the bolts through and if your measurements are off at all it gets even harder. You’ll notice my tire bag is a bit asymmetrical – I could have taken more time to ensure things lined up right.
My second tip here is to just get the bolt far enough that you can put on a nut. Don’t worry about the washer for now. Once you have the nut on – use a wrench and tighten it down. It will pull the bolt the rest of the way through. Then take the nut off, put a washer on and then put the nut back on and tighten down. You now do the same thing for the other two tires one at a time, stacking them on top and bolting them to the two you just bolted together.
3. Put on the U-Brackets. Once you have your four tires bolted together – mark the top tier the same way you did the bolts, then use one of the U-brackets to mark where the smaller holes need to be drilled for each U-bracket. Drill them, insert the U-bracket and tighten. All done.
4. Hang Your New Tire Heavy Bag. You can use rope or chain – whatever you have. Feed the rope through the U-brackets in a manner that allows you to hook it onto whatever bracket you have attached to your heavy bag stand. Alternatively you can just loop a chain or rope right over the top beam. I won’t bother trying to explain this part – I think it’s easy enough to figure out how to get it hanging.
And there you have it – a tire heavy bag that will give you hours and hours and hours of punching pleasure. You should know that this isn’t my invention. People have been building these things for years. I actually came across it on YouTube (of course):
Muay thai / Boxing Tyre Bag – Explosive Fitness
(Tires) in Boxing Training (Good For Upper Cut Training)
Since match-ups are often decided on the day of a bout, amateur boxers rarely have a chance to scout future opponents. If the opportunity does present itself, though, take full advantage of it. Study your future opponent’s game, analyse his style, and devise a strategy. The rest of this guide highlights six important details to note as you watch a future opponent compete in the ring.
The Six Steps to Scouting
Generally speaking, there are six aspects to scouting:
Identifying your opponents fighting style
Identifying your opponents strengths.
Identifying your opponents weaknesses.
Study previous fights of your opponents bouts and Identifying what works well and what does not work well against them from their previous opponents.
Deciding how your personal strengths/weaknesses match up.
Formulate a strategy.
You need to recognize both you and your opponents strengths and weaknesses in order to properly formulate a game plan. The following five steps should help you accomplish this task.
Identifying Your Opponents Fighting Style
Styles vary from boxer to boxer, and experienced fighters usually adopt aspects from several different fighting styles. However, it’s possible to get a feel for how a boxer prefers to fight, which will help you make a general conclusion about his style. Rarely will a boxer take an overly-aggressive swarming approach for one bout, and then completely transform into a dominant counter-puncher in the follow match. That being said, you should be ready for anything and realize that a single bout won’t expose everything.
Here’s a list of possible styles:
Out-fighter
Boxer-Puncher
Brawler/Slugger
In-fighter
Bob-and-Weave Fighter
Puncher
Counterpuncher
Southpaw
Identifying Your Opponents Strengths And Weaknesses
You need to read and study ” Chapter- Scout & Test Your Opponent” on the following subjects:
Read their Universal Signs: These are based on physiology. For instance, the hips have to rotate a certain way to throw a certain punch.
Read their Idiosyncratic (Personality Driven) Signs: These are unique to your opponent. They are habits they have developed over time which have either gone unnoticed or unchecked.
More Tips To Read Your Opponent
Study Previous Fights of Your Opponents Bouts&Strategize without Over-thinking
Videotapes allow you to dive even deeper into your analysis. You can rewind parts of the bout that you find particularly interesting, and truly study your future opponent. However, never lose sight of your own training and capabilities by worrying too much about your competitor. Amateur bouts are relatively short. When in doubt, keep your hands up and throw punches.
Deciding how your personal strengths/weaknesses match up.
The first step in scouting takes place way before you even see your opponent for the first time. Throughout training, you should identify your own strengths and weaknesses by talking to your trainer and experimenting with different approaches while sparring.
Everyone has personal strengths and weaknesses. For the most part, your fighting style develops not from a preference to be an out-fighter or brawler, but rather from your own personal capabilities. Always work on your weaknesses, but realize that you’ll need to utilize your strengths in order to be successful in the ring. Take your strengths and weaknesses into account as you watch your opponent to match up yourself against them and formulate a strategy.
Formulate a strategy.
Take your opponents Fighting Style, their Strengths & Weaknesses, your analysis of your Opponents Previous Fights and Your Strengths & Weaknesses into account to adjust your Fighting Style and formulate a strategy.
Elite fighters are difficult to hit because they maintain an effective guard and possess skilful defensive techniques. An experienced boxer can defend against a single jab, but he can also easily counter the attack. That’s why you need to incorporate subtle offensive techniques to create openings on your opponent. This guide discusses the art of setting-up your opponent with fakes, known as “feints.”
Understanding the Feint
The term “feint” refers to a fake punch or misleading movement that causes an opponent to react and open up. Over the course of the bout, feinting exposes your opponent’s tendencies and reactions to specific punches. His reaction to your movement allows you to move forward in the match with a better understanding of where his vulnerabilities lay.
Hot Tip: Creating Space
Feints are especially useful against aggressive opponents. Often you can stop an aggressive opponent in his tracks by feinting. Feinting creates space as he walks forward. If he doesn’t react to your feints, then blast him as he walks into your range.
How to Feint
There are different types of feints — some involve just the eyes and hands, while others involve the entire body. Feints are the ultimate set up move, but success relies on your ability to land punches. Once you’ve hit your opponent, he’s much more likely to react quickly and emphasize his defence to ensure that it doesn’t happen again. If you’re good with your feints, you can take advantage of the openings that emerge each time he reacts.
A simple feint sequence plays out as follows:
Look at a specific area on your opponent’s head or body.
Begin to throw a punch, but stop the punch midway through the punching motion.
Pay close attention to how your opponent reacts.
Respond with a punch that exploits his vulnerabilities. For example, feint a jab to the head. Your opponent may raise his hands to block or parry your jab. Throw a cross to his body.
More advanced feints involve the use of clever footwork as well. Here’s an example:
Look at a specific area on your opponent’s head or body.
Jab step with your front foot — a jab step involves stepping forward quickly in the direction of your opponent, before returning your foot to its original position.
While you’re jab stepping, simultaneously incorporate a head feint — move your head quickly forward then back to its original position.
Respond to his reaction by feinting then attacking. If he simply backs up each time you feint, then continue to come forward and back him up against the ropes where you can bang away.
Steps two and three deceive your opponent by making him think you’re about to attack.
“Jose Torres, my former stable-mate and the light heavyweight champion of the world . . . gives the best definition of a feint that I’ve ever heard: ‘A feint is an outright lie. You make believe you’re going to hit your opponent in one place, he covers the spot and your punch lands on the other side. A left hook off the jab is a classy lie. You’re converting a I into an L. Making openings is starting a conversation with a guy, so another guy (your other hand) can come and hit him with a baseball bat.”
Floyd Patterson Former Heavyweight Boxing Champion
Overwhelm Him
Clever fighters deceive opponents with feints and intricate punch combinations. Feints can confuse or surprise your opponent, since he has to determine whether or not each punch is a real threat to land. Likewise, combining feints with complex punch combinations can lead to easy points if your opponent visually exposes holes in his defensive game. Lastly, be smart defensively. Don’t over-commit to a defensive manoeuvre, such as a parry, that could potentially leave you vulnerable. Keep your parries tight, knowing that your opponent may incorporate feints as well.
The OODA loop has become an important concept in litigation, business and military strategy. According to Boyd, decision-making occurs in a recurring cycle of observe-orient-decide-act. An entity (whether an individual or an organization) that can process this cycle quickly, observing and reacting to unfolding events more rapidly than an opponent, can thereby “get inside” the opponent’s decision cycle and gain the advantage. Frans Osinga argues that Boyd’s own views on the OODA loop are much deeper, richer, and more comprehensive than the common interpretation of the ‘rapid OODA loop’ idea.
Boyd developed the concept to explain how to direct one’s energies to defeat an adversary and survive. Boyd emphasized that “the loop” is actually a set of interacting loops that are to be kept in continuous operation during combat. He also indicated that the phase of the battle has an important bearing on the ideal allocation of one’s energies.
Boyd’s diagram shows that all decisions are based on observations of the evolving situation tempered with implicit filtering of the problem being addressed. These observations are the raw information on which decisions and actions are based. The observed information must be processed to orient it for further making a decision. In notes from his talk “Organic Design for Command and Control”, Boyd said,
The second O, orientation – as the repository of our genetic heritage, cultural tradition, and previous experiences – is the most important part of the O-O-D-A loop since it shapes the way we observe, the way we decide, the way we act.
As stated by Boyd and shown in the “Orient” box, there is much filtering of the information through our culture, genetics, ability to analyse and synthesize, and previous experience. Since the OODA Loop was designed to describe a single decision maker, the situation is usually much worse than shown as most business and technical decisions have a team of people observing and orienting, each bringing their own cultural traditions, genetics, experience and other information. It is here that decisions often get stuck, which does not lead to winning, because
In order to win, we should operate at a faster tempo or rhythm than our adversaries–or, better yet, get inside [the] adversary’s Observation-Orientation-Decision-Action time cycle or loop. … Such activity will make us appear ambiguous (unpredictable) thereby generate confusion and disorder among our adversaries–since our adversaries will be unable to generate mental images or pictures that agree with the menacing as well as faster transient rhythm or patterns they are competing against.
The OODA loop, which focuses on strategic military requirements, was adapted for business and public sector operational continuity planning.
The key is to obscure your intentions and make them unpredictable to your opponent while you simultaneously clarify his intentions. That is, operate at a faster tempo to generate rapidly changing conditions that inhibit your opponent from adapting or reacting to those changes and that suppress or destroy his awareness. Thus, a hodgepodge of confusion and disorder occur to cause him to over- or under-react to conditions or activities that appear to be uncertain, ambiguous, or incomprehensible.
The OODA Loop also serves to explain the nature of surprise and shaping operations in a way that unifies Gestalt psychology, cognitive science and game theory in a comprehensive theory of strategy. Utility theory (the basis of game theory) describes how decisions are made based on the perceived value of taking an action. The OODA Loop shows that prior to making a decision (the Decide phase), the person will first have to get information (Observe) and determine what it means to him and what he can do about it (Orient). In this way, the utility sought at the Decide phase can be altered by affecting the information the opponent receives and the cognitive he applies when orienting upon it.
Writer Robert Greene wrote in an article called OODA and You That
the proper mindset is to let go a little, to allow some of the chaos to become part of his mental system, and to use it to his advantage by simply creating more chaos and confusion for the opponent. He funnels the inevitable chaos of the battlefield in the direction of the enemy.
There’s a difference between sparring and fighting. Fighting destroys you whereas sparring develops your skills! Want to get better without getting beat up? Learn how to spar correctly!
Training on equipment only develops your technique.
Training in the ring develops your fighting skills!
Sparring is probably the most important training aspect of being a fighter. Sparring goes beyond punching and defence. This is where you actually learn to fight. You get to see what works and what doesn’t. You find out exactly what needs to be improved. Unfortunately, this isn’t the case for many beginners—they only find out how tough they are or aren’t. After seeing way too many boxers getting destroyed in sparring, it just hit me that most beginners don’t know how to spar!
You might have gone through this when you first started: You step into the gym, learn the basic footwork, basic defence, and all the punches. And then the question arrives, “When do I get to fight?!”
You’ve been fantasizing about it long ago, you’re just itching to punch anything that moves. You don’t care about sparring! You don’t want to “spar”, you want to fight! You’re tired of beating up the heavy bag and now you want to go Mike Tyson on somebody!
Or maybe you’re the different kind of fighter. You tried out boxing to conquer your fears and you fell in love with the intellectual part of it. You love the idea of having to think fast and make split second decisions. Boxing isn’t fighting to you, it’s more like a video game with you being the player.
Regardless of which fighter you are, the result is always the same. You get put into the ring and told to “just fight” the other opponent. Sure, they tell YOU to go easy but what about the other guy? You were going easy but the other guy hit you hard first…and so you had to retaliate. If you’re lucky, you were put in with a beginner that’s even worse off than you. He could barely defend himself and here you are beating up him just as you were told to do.
You might feel great about landing all those punches but one day you find yourself in his position. Your trainer puts you in with someone with more skills or size on you, and he likes to fight. This time is going to be different. This guy doesn’t care about you and will stop at nothing to destroy you. Taking punches as an inexperienced boxer is a lot less fun than you thought. This isn’t a Rocky movie any more. Having heart means nothing. The harder you fight back, the harder you get beat up. Having to choose between getting beat and getting beat up is a tough decision to make. Unfortunately, it’s your opponent that has the power to choose, not you.
I really REALLY hate trainers that start out beginning boxers that way. Some trainers actually know how to develop a fighter from controlled sparring to full sparring. However, there are too many trainers that prefer the sink-or-swim method of testing a brand new fighter to see if he’s “got what it takes” to be a fighter. The sink-or-swim method, in my opinion, is a really messed up way to train someone. I blame the recent fall of boxing’s popularity on this practice alone. This is NOT how you train someone. Beginner skateboarders don’t jump off rooftops. Beginner gymnastics don’t start with a back flip to “test their potential”. So why are beginning boxers forced to prove a higher level skill without first being given the chance to develop their potential? Some trainers don’t want to waste their time with individuals that don’t have the natural aggression. I can’t help but argue that the same temperament that wins gym fights is the not the same temperament that wins championships. Any street thug can win a gym brawl using well-practiced backyard fight tricks. Enter the same thug into a Golden Glove tournament with his wild swings and over-confident mentality and I promise you a different result.
The practice of having young fighters destroy each other is stupid. These trainers aren’t just destroying the fighters, they’re destroying the sport.
Sparring is NOT fighting.
Sparring is to develop skills, not to determine a winner.
And therein lies the truth. Learn how to spar correctly and you will become a better fighter in much less time. Don’t waste time by trying to win all your sparring matches. Winning is easy…just keep doing something you’re already good at and do it against an inferior opponent. Sparring properly however, requires you to control yourself a bit and focus on skills that need more practice. Sure you might get hit but that’s what controlled sparring is for. Controlled sparring allows you to work on new techniques without getting beat up for making mistakes.
If you are losing the sparring session:
Don’t be too proud to admit to people that you need the pace to be easier and that you need the shots to be lighter. if you’re scared of getting hit, you need to slow down the pace. You’re not a sissy for requiring more time to get use to things. You have to give yourself a FAIR chance in the fight to learn. Getting beat up by someone more trained (or more natural at fighting) than you proves nothing more than that you can take punishment.
Tell your sparring partner that he’s too fast. Ask him for tips on what you should do…he’s the one fighting you, he may know you better than your trainer does! (It’s never too late to turn a sparring session into a friendly class.) Be humble and don’t act like you’re better than others (even if it’s true). Show respect and let people know that you appreciate their knowledge. Beginner boxers do not get better magically overnight without ever having to learn from more experienced boxers. Slow down the pace, so that your eyes can see EVERY microscopic detail about your opponent’s form, movement, and technique. At the same time, you will be more aware and able to focus on your own techniques and see where they might have left you open.
If you are winning the sparring session:
Do not be deustchbag. Give your sparring partner a chance to fight. This improves YOUR SKILLS in 2 ways. One is that you’re giving him a chance to learn, so he’s going to get better…which in turn makes you better because you’re now training with a better opponent. The second is that you WANT to spar with a confident opponent. Let him fight back and give him a chance to test you.
You want to spar against a more capable opponent, right? Then give him a chance. Don’t shut him out by over-powering him or using tricky moves that scare the crap out of him. Give him a chance to fight so that you have a live opponent that throws punches against you and tests your skills better. There is no need to show off against a beginner…doing that only impresses other beginners anyway.
Save your tricky tactics and KO power for competitions. Competition opponents are the guys you want to knock out and shut out of the fight. These are the guys you want to beat up and not even give them a chance to come back at you. Respect the sparring partners in your gym. They will respect you in return and always be willing to help you in any way they can. They may even give you some helpful tips since they are not afraid of you using them to beat them up.
I’m not asking for you to tie your hands behind and make things unnecessarily challenging for you. I’m simply asking for you to allow your opponent’s strengths to shine.
You always want the best out of your sparring partners so that they may bring out the best in you.
Yes, I understand that sparring should at least mimic real fighting and prepare fighters for real fights but this higher level of sparring should only be for fighters that are USE to fighting. Beginners are nowhere near their fighting potential and their sparring intensity should be controlled as much as possible.
So you understand it now: Sparring is supposed to be easy and controlled so that both fighters get a chance to learn and improve. Here are some great basic sparring routines used by gyms to develop great beginner boxers! Take your time and enjoy each one. I’ve been boxing for years and still enjoy simple jab sparring by being creative and goofing off with my sparring partners.
Getting Comfortable In The Ring
Punching VS Trained Fighter
A great way to start off a beginner is to have him throw punches against an experienced trainer or fighter who will not punch back. Don’t pit the beginner against someone only slightly better. The beginner might land a good punch which challenges the other fighter’s ego into firing back. It’s better to put the beginner in with someone much better who can take the punch and defend without returning fire. Adjust the beginner on form, breathing, offence, defence, etc.
Shadow box in the Ring
First time boxers aren’t use to standing face to face across another person. In this drill, two beginners will shadow box against each other in the ring. You move around like a real fight, except you’re 6-12 inches out of range so nobody actually connects with any punches. This can be done with just hand wraps on (good for warming up), or with gloves on so both of you can get used to the weight of gloves.
You’re not throwing just random punches whenever you feel like any more. You got to pay attention to the man in front of you. Respond to his punches as you throw your own. You have to move when he moves at you, and you throw punches when you see openings. This should be your first exposure to spontaneity in boxing training where you’re no longer throwing punches when you feel like (like you would on a heavy bag).
Catching Jabs
Here’s your first chance to practice making contact with each other, but very lightly. Move around the ring and take turns catching each other’s jab. Each person takes a few steps in any direction and then throws a jab as the other one catches. Be calm and smooth. Don’t worry about scoring. Pay attention to your balance, your stance, and form. Try not to get out of balance when you throw a jab or defend against one.
You guys are not supposed to hit each other hard, no “rocket jabs”. Both fighters are not allowed to get closer than arms length. The goal is to get use to throwing and catching each other’s punches. The goal is not to actually land jabs, so the fighters should be throwing easy jabs at each other to make catching easier.
5 Jab Drill
It’s like the catching jabs drill but now each boxer throws 5 at a time before they switch. This time you want to get a little more creative in throwing and defending against the jabs. Don’t always aim for the head. Try aiming for the body, chest, shoulders, or elbows. You can throw your 5 jabs anyway you want. 2 quick ones and 3 slow ones. Or all 5 thrown one at a time. You can throw the jabs anyway they want but you have to keep arms distance when you jab.
The defender can avoid the jabs anyway he wants. He can block with the right hand or right arm. He can parry if he wants, it doesn’t matter. The defender is also free to move entirely out of range if he wants and just let the jab hit air. As long as the defender isn’t jumping out of balance to avoid the jabs, moving in and out of range is a great boxing skill to learn.
Another good variation of this drill is to just throw 2 jabs at a time instead of 5. Each boxer will take turns throwing double-jabs at each other. The defending boxer has to catch the first one and slip or out-manoeuvre out of the way of the second one.
1-2′s (three punch maximum)
Both boxers are now allowed to use their right hand, but combinations are limited to only 3 punches. Both fighters will take turns throwing 1-3 punch combinations using a straight right if they wish. No hooks or uppercuts allowed. The defender is not allowed to counter, he can only block. This prepares both fighters to absorb right hands. Again, the power should be light!!!
CONTROLLED SPARRING
Jab Sparring
Now the boxers are free to spar using ONLY their jabs. Again, no powerful rocket jabs allowed! The boxers don’t have to go back and forth taking turns any more. They can attack and defend at will. Pay attention to form and balance. Make sure the back hand doesn’t drop while they are throwing the jab. Use offensive jabs, defensive jabs, and counter-jabs. Don’t just aim for the head, throw some at the body or even the other boxer’s guard to test his defence.
1-2 Sparring
Very light sparring using only jabs and crosses. Use only 25% power. But how do you define 25% power?! I’ll make it easy: your punches should be light enough that the punch doesn’t hurt at all if it lands flush on the face. The moment one hits too hard that an impact sound can be heard, there should be a trainer to immediately stop them and slow the pace down again.
The focus is on offence, not defence. Both fighters should be throwing more punches than moving and try to stay without punching range. They are not allowed to jump in and out of punching range. They are also not allowed to flinch. If you see one fighter closing his eyes, immediately slow the pace down again. In the very beginning, this pace can be frustratingly slow. Both fighters may even feel like they’re fighting in slow motion but it has to be done. It gives them a chance to really see what their opponents are doing. You want fighters to learn how to box using their eyes as opposed to using their memory and just ducking punches in anticipation.
1-2-3 Sparring
Same as 1-2 sparring but both fighters are now allowed to use the jab, cross, and hook. Again, very light and performed at 25% power.
Full Sparring
All punches allowed! Jabs, crosses, hooks, uppercuts, everything! Again, 25% power and controlled pace. Not allowed to move to use quick offence or quick defence. They are not allowed to flinch or quickly jerk their head out of range. If they missed the block, just take the shot (it shouldn’t hurt) and worry about the next one coming. No flinch blocking allowed! They are definitely not allowed to out speed each other. Allowing 2 fighters to spar with speed very quickly becomes a game of power and then straight brawling not too long after.
Going slow is the proper way to work individuals into sparring and give them a chance to use what they learned, instead of them destroying each other like a bunch of wild animals.
How to know when fighters are going too fast or too hard.
They are hitting hard.
This is pretty obvious. If you hear a giant smacking sound when punches land, stop the session immediately and make them lighten up by just throwing touching punches again. Tell them to think of their punches as “tagging” each other instead of loaded punching.
They’re flinching (or closing their eyes).
Flinching is not a good thing—closing your eyes in a real fight leaves you defenceless against punches you can’t see. Make sure they’re going slow enough that they can keep their eyes open and not flinch in anticipation. Keep slowing down the fight so everyone has a chance to see what’s going on right in front of them. Another way to keep fighters from flinching is to disallow tricky tactics. Everyone is supposed to just throw the classic boxing combinations. Lots of jabs with some right hands. No crazy uppercuts and long range left hook leads!
They are making panic movements.
This is the same as flinching but instead of with the eyes, it’s with the body. You can always tell if it’s a panic movement when you see a boxer jerk his head out of the way or quickly try to slap a glove away. Again, control them. Tell them that if they didn’t see the shot, don’t worry about it. Let the punch land and just focus on the follow-up shots which are probably more dangerous. Block what you can and don’t worry about the rest. Do NOT chase down every punch and try to slap or out manoeuvre every punch.
They spend more time running than punching.
There’s nothing wrong with moving and using footwork. The problem is that the fighters are probably going too hard or too fast and so they don’t want to engage much. For the sake of getting accustomed to sparring, you want them to be at arm’s reach more and work with each other. Instead of jumping in and out of range and fighting only one punch at a time, you want them to stay in range and fight in combinations. Again, they should be sparring so light that they can take entire combinations without getting jarred.
They’re getting tired.
If you’re getting tired and getting injured, you’re going too hard! You’re also not supposed to be scared! So make sure you’re man enough to turn down the pace where both fighters can enjoy sparring for 8-10 rounds easy. Even on days I’m tired, I can still go 15 rounds of sparring, work on techniques, and still have a great time in the ring. I achieve this by simply slowing down the pace. Every now and then I have to ask my opponent to slow down and he does it happily because he wants to keep sparring too! Remember…
Training on bags and mitts only develops technique.
Training in the ring develops fighting skills.
So if you want to become a good boxer faster, try to spend more time in the ring; but this will only be possible if you slow down the pace so that you don’t get tired too quickly. I think it’s so silly that people will train on a heavy bag for 2 hours and then completely gas out in the ring in just 3 rounds. That’s only 9 minutes of skill development! And they wonder why they work so hard yet make little progress over the months. Don’t mess up a good workout by getting tired!
They’re not enjoying it.
The is the biggest error of improper boxing sparring, and boxing training in general. If you don’t enjoy sparring, you are not enjoying boxing! Sparring is the closest aspect to boxing-fighting, it’s truest form of the sport. You have to love sparring! It’s beyond winning or being tough. It’s about the skills, the technique, and the beauty of it all. Learn to love sparring…not because it’s manly but because you have fun even when you’re tired or outclassed or not having a good day. This is only possible by enforcing controlled sparring conditions.
Controlled Sparring Theory
Controlled sparring is what skilled boxers use to develop their boxing skills. That’s the secret. The best gyms I’ve seen spar softly. Sure, they might look like they’re going intense but they’re really not. It’s fighters who are comfortable with each other and trust each other to pull back when exchanges are won and so they are able to go a little faster and a little harder. However, their increased intensity is STILL controlled. They are not wailing on each other or chasing each other into the corners and trying to get a KO. They are landing beautiful combinations and avoiding many punches along the process. Their footwork isn’t panicky, it’s smooth and relaxed but swift when it needs to be.
Let me give you another reason why you don’t want to spar hard:
If you spar too hard, you will tire prematurely and get less sparring practice.
Think about it. You can be foolish and burn all your energy in just 3 rounds by sparring at 100% intensity. Or you can slow down the pace so that you can work in the ring for 10-15 rounds easily. I’m going to bet all my money that the boxer that spars 10-15 rounds in one session (testing his skills) is going to get better faster than the one that only spars 3 and tests only his conditioning. Sparring is when you practice and develop most of your boxing skills. So you want to be able to spar as long as possible. Once you get tired, you won’t have the energy to practice your skills. The sparring simply turns into an endurance workout, which does nothing for your skills. Anybody can get in shape with just 2 months; developing boxing skills will take years.
Don’t try to win a sparring match.
Push yourself physically in sparring, but not the point to where you can’t learn anything. Develop your skills, correct your weaknesses, and get use to “fighting”. But don’t spar with the attitude of trying to “win”. When you’re a beginner without developed boxing skills, it’s too tempting to want to use anything other than skills to win. You might decide to rely on your superior endurance, or size, or that hard right hand shot. If you win this way, you’ll learn nothing. You won’t be any better after the sparring than you were before you got in there.
You also shouldn’t be trying to knock out your opponent. If you blow your opponent out early, your workout is too easy and you don’t get to work on the higher level skills. Defeat your opponent too easily and you will have only gotten a heavy bag’s worth of exercise. Give you opponent a chance to move with you and you benefit from a greater workout! Let that sparring become a dance, with both of you getting more and more comfortable with each other. Using more punches and using more movement. You want a partner who will get better and test your more so give him a chance to fight back.
The worst part about destroying a fighter in sparring is that you might have destroyed his spirit forever. This sounds cool in the movies but in person it’s horrible. Back when I was younger, I use to be the jerk that tried to destroy everyone. I don’t know what the hell was wrong with me but I made many fighters quit and I never saw them in the gym again. They might have loved the sport but they sure as hell didn’t enjoy it in the ring. Sure, boxing isn’t for everyone but I still feel terrible for making people quit a beautiful sport forever. Nowadays, I refuse to brutalize anyone in a sparring match and I’m very proud of having grown past that. I NEVER throw a punch above 75% power any more, and the beauty is: I don’t need to any more. Beating up sparring opponents using only power is a cowardly way to train. Just find anybody weaker than you and you will have yourself an easy day.
Now what if you’re on the losing end of a sparring match? Is your opponent being a jerk and just trying to KO you? He’s a coward if he’s doing that. Just stand up for yourself and let him know, or your trainer know that he’s going much too hard. And that he’s not giving you a chance to work. If you feel uncomfortable, just get the hell out of the ring. You do not owe anybody an ass-beating to prove anything to anybody. This is your health and your experience in the sport. If your sparring is taking away your ability to learn and enjoy boxing, you need to take responsibility and just step out of the ring. A real man respects his limits and accepts the responsibility to protect himself.
Sparring is a time for you AND your opponent to help develop each other’s skills by practising real boxing moves in a real boxing environment. It is not the time for both fighters to try and beat each other up. Having an opponent close up his defence and run from you will not develop your skills in the ring. Give him a chance to work and be the best he can be, so that he may push you to be the best you can be. Save that “winning” attitude for competitions.
One of the reasons I love boxing as much as I do is that it directly relates to my profession. Being in the military, a lot of the strategy and tactics that are relevant at work are also relevant in the ring.
Once you step in the ring, the following tactical principles apply. They are not applied separately but combined to achieve maximum effect:
Decisiveness. An essential quality – indecisiveness leads to inaction which leads to you reacting rather than controlling a fight. If you are reacting, you are defending and receiving damage rather than dishing it out. You must have a clear purpose and gameplan. You must enter the ring knowing you are going to destroy your opponent and not hesitate giving him openings to get inside your decision cycle (OODA loop).
Speed. Instinctive, rapid movements that come from muscle memory and drills executed without thought will help you gain the initiative over your opponent. If you can act and react faster than they can, you have surprise on your side and they don’t stand a chance.
Concentration of Force. To achieve maximum force and effect, all parts of your body must act simultaneously to generate power. An arm punch might sting, but a proper punch with all the force of the legs, hips, shoulders, arms, and momentum will knock buddy out. All of that power generated has to be released instantly at impact so you can prepare for the next action. This is done by remaining relaxed and “loose” only tensing at the moment of impact putting every ounce of power you generate into a pinpoint target.
Flexibility. Nothing ever goes as planned. In the army we have a saying that every plan is perfect until first contact. Every situation is unique and can never be controlled with precision and certainty. As a result, you have to be ready to adapt quickly in order to maintain any advantage you have or can gain.
Simplicity. You do boxing drills for a reason – so they are instinctive. Increasing the number of possible choices you have in your arsenal leads to an increase in reaction time. Even a half second delay could mean the difference between winning and losing, so you need to perfect a few perfect offences and discard any fluff. Don’t go into the fight with complex tactical plans where you are going to win an award for the longest technically perfect combination or most blocked shots before landing the perfect punch. KISS it – Keep it Simple Stupid.
Gaining Advantage
Also known as seizing the initiative, you should be aiming to use your opponent’s movements to leverage your own advantage. For instance, you can generate far greater force punching someone moving towards you than you can as they move away.
You must use every weapon in your arsenal to exploit every advantage that presents itself to ensure a successful outcome. That may mean employing deceptive measures, feints, superior conditioning, superior skill, achieving surprise, stealth and ambiguity.
Anything you can do within the rules to gain an advantage and control the fight is in your best interest to do.
Exploit Success
Boxers are a determined bunch. Nobody who properly prepares and puts themselves through the intensity of workouts and sparring sessions will get in the ring and give up after they get hit. Thus, one hit is never enough.
If you hit someone, you follow up with more hits. Even if it looks like they are going to fall, you don’t stop until they have actually fallen. If you give up the opportunity to finish an opponent, you give your opponent a second chance to finish you – is that really something you want to do?
Embrace these principles – they apply directly to boxing as they do to any combat situation in the military. They have been proven over and over again in far more dangerous situations than you’ll ever find in a boxing ring.
Pre-Emption
To pre-empt someone is to forestall or prevent (something anticipated) by acting first.
It is a mission verb used in combat to describe a situation where you attempt to launch an offensive effort before your opponent in order to seize and then maintain the initiative. You know your opponent is planning something, but you need to beat him to the punch (literally).
Everyone has a decision cycle (also referred to as an OODA loop). When you see something happening, your brain has to process it, make decisions about that event and then cause of action to react to it.
If you can launch your offensive before your opponent makes his next decision, you get inside their OODA loop and pre-empt their attack. You always want to be one step ahead of your opponent, planning your next move while there is still reacting to the last one.
A Quick Story
Pre-emption: Hit Before Getting Hit
Once you know what your opponent is going to throw, it causes shock and disbelief when you beat them to the punch. I remember sparring with a young guy and it was incredibly easy to see when he was going to throw a jab. Repeatedly, I would strike first knowing that over and over again, he was going to tell me exactly when he was about to throw his jab. Not only did I pre-empt his attack with an offence of my own, but I also disrupted his attack. (another combat mission verb).
By the end of the sparring, the lad was completely demoralized. He thought I possessed super speed to be able to beat his jab time and time again with a jab of my own, and his nose was quite sore where he got popped over and over again.
I was completely inside his OODA loop and knew what he was going to do before he did. It’s about this time you begin to feel invulnerable.
Read Your Opponent
In order to pre-empt, you need to know when your opponent is going to launch his attack. So, watch for the signs of an incoming punches, knees, elbows or kicks.
Take note of any slight patterns in your opponent’s body movements and facial expirations.
Be aware of your opponent’s feet, knees, legs, hips, gloves, elbows, shoulders and head.
When your opponent is moving around the ring in rhythmic patterns. (Most people train with music and adopt the rhythmic patterns in their foot movements, making them very predictable)
Most fighter’s will drop their gloves to rest, just as they reach your outer zone, (this is a great opportunity to attack with an lunge combination or same sort of lunge attack)
You see balancing movement of Your opponent’s feet. (A sign of are lunge attack, kick or knee might be thrown)
You see movement of Your opponent’s knee. (A sign of a kick or knee might be thrown)
You see balancing movement of Your opponent’s glove. (A sign of are punch or elbow might be thrown)
You see balancing movement of Your opponent’s elbow. (A sign of are punch or elbow might be thrown)
You see movement of Your opponent’s shoulder. (A sign of your opponent about to execute an combination or same sort of attack)
Your opponent’s hips begin to rotate. Is a great sign that their weight is shifting. (A sign of your opponent about to execute an combination or same sort of attack) and if you can time it well
Your opponent’s shoulder begins to moving (A punch or elbow might be thrown).
Your opponent’s elbows begins to rotate up leaving there stomach and ribs exposed.
Your opponent’s hands drop leaving there chin wide open. (take special note of this when Your opponent is throwing punches, knees, elbows or kicks)
Obviously not a definitive list and it will vary from boxer to boxer, but all of us forecast our intentions in some way. The quicker you can pick up on your opponent’s tells, the quicker you can decide how the fight is going to go.
Strike First
As soon as you see any of these signs, strike. Do not think about it. If you are right and your opponent is throwing a punch, by the time yours makes it to them, they will be wide open. Have faith that you will hit first. You will be elated the first time you do this and you connect. It’s like your opponent just drops their hands and lets you hit him.
Look for the Surprise
A bonus feature – look for the look of utter surprise in your opponent’s face following your attack. They will have no idea how you managed to throw a punch that quick. Remember, they will be caught up in their decision cycle. Their brain will be engaged in deciding to throw a jab. They won’t be able to react to yours until their cycle has completed – so beat them to it.
When you’re approaching your opponent and getting into range, keep both hands up and keep your eyes on your opponent’s face, shoulders and chest. This way, you can easily spot any movement with either arm.
As soon as your opponent throws a punch, you quickly bend at the knees, (not your waist).
At this point, you can combined the shoulder blocks into the duck and weave. Instead of just keeping your hands up.
Move your head and shoulders (in a “U” shape motion) . By using the ball of both feet, and the bend your knees, to move your head and shoulders in a “U” shape motion, to the outside of that punch or shoulder. When using the ball of your feet and the bend in your knees, it creates an more flexible and agile motion to move your head and shoulders in a “U”-shape, without throwing yourself off balance.
Remember to keep your weight cantered at all times.
For example, assuming that you and your opponent are both orthodox, and he throws a left hook, then drop down by bending your knees and move your head to your right side so you’ll end up on the outside of that punch or shoulder. You don’t necessarily have to always move your head in a “U” shape motion. Usually, you’ll find that just by dropping your knees, you’ll automatically end up on the outside of your opponent’s punch or shoulder, but, it’s only if your opponent commits to the punch.
When you come back up, don’t fully stand up, but continue to keep your hands up/shoulder blocks. You should be still have your eyes fixated on your opponent’s head, shoulders and chest level. If your opponent is throwing fast combinations, then you may want to continue to duck and weave back and forwards again. If you’ve done it correctly, you should end up on the outside of your opponent’s shoulder and punch when you come back up, meaning that he’ll be wide open for an attack.
Things to remember:
Moving Head From Side To Side: There is nothing wrong with this if you’re in your original stance position. This is called slipping punches, which you can incorporate within the bob and weave. However, many inexperienced fighters try to slip punches when they’re down low during their ducking and weaving technique. This is incorrect because your hips and head cannot move quick enough in that position. And you will get hit by your opponent’s punch.
Bending At The Waist: When you’re ducking and weaving, you’re supposed to bend at the knees and not at the waist. Bending at the waist leaves you in a vulnerable position for the uppercut. You also won’t be able to see the punch coming because your eyes will be looking down instead of on your opponent’s head, shoulders and chest.
Bending Too Low: Not only is it illegal to bend too low in boxing, but you also won’t be able to come back up quick enough to throw a counter-punch. As well as being off balance.
Moving In The Same Direction As A Punch: If your opponent throws a left hook, do not move to the right, otherwise you’ll be moving into a position where you can get hit by your opponent’s right hand. You must move to the outside of opponents punches or shoulder so your opponent cannot reach you with his right hand.
Squaring Up: While ducking and weaving, you must always maintain your original feet positioning of your proper boxing stance. Don’t stand with both feet aligned horizontally facing your opponent because you can easily be knocked off balance and you’re offering yourself up as a bigger and wider target.
Coming Up With Guard Down: Often, inexperienced fighters will duck and weave with their guard down because it helps them see what direction the punches are coming from. This can lead to devastating consequences if their reflexes aren’t working. Ensure that your hands are kept by your chin and not below, or not covering your vision.
Mastering The Duck And Weave
Fortunately, there are some easy ways to practice the duck and weave technique. The following two are the most common.
Using Rope:
You’ve probably seen somewhere before a rope tied from one ring post to another. This allows you to shadowbox while practising your ducking and weaving, by ducking down, than under the rope and weaving up the other side of the rope, from one side of the rope to the other. First try to ducking and weaving on the spot and then try ducking and weaving, while you move forward and backwards.
You can virtually tie the rope anywhere with enough space and at equal height, it doesn’t have to be in the ring. Just make sure that the rope is at around your shoulder height when you’re standing in your boxing stance.
Using Partner:
This is probably a more effective way to learn the bob and weave because you can measure range and timing by using a partner to imitate jabs and hooks. Preferably you should use someone that is taller and has a longer range than you, as you’ll be bobbing and weaving to get on the inside usually of a taller opponent.
Most beginners don’t bob and weave correctly because they’re worried about getting hit when getting into range. You’ll find that once you’re more confident and experienced, bobbing and weaving will come natural and your reflexes will become better.
Ultimately, the duck and weave should be combined with shoulder blocks, slipping punches, sliding and side stepping in order for you to have a well-rounded defence.